29 May 2008

To Darn or not to Darn?

No, I'm not swearing, I'm talking about mending socks. Most of the time, socks will develop a hole at the heel or toe, long before the whole sock is worn out. I used to just throw these out and buy new ones, but as part of our quest for simple living, I've been mending them instead. It doesn't take long really, and there is an immense feeling of satisfaction in making something last that little bit longer, rather than just throwing it out. Believe it or not, I actually enjoy darning socks, and seeing that hole disappear under a neat tapestry of stitches.

One of the main reasons I never mended socks (other than sheer laziness, which certainly played it's part), was a lack of knowledge. If I had thought about it, I probably would have tried to sew the two damaged edges together, which would have made a big lump on the sock. And seeing as I'm rather sensitive, it would have driven me mad, so I never even tried. This is where the wonder of the Internet comes in. Darning instructions are easy to find, and probably a video or two if you really want. I used http://www.wikihow.com/Darn-a-Sock, But don't get put off, you don't really need a 'darning mushroom', I just used an old glass bottle, and it works fine.

It is also causing me to look more closely at the socks we do buy. Some socks are flimsy, and the material will thin and stretch before it even gets to the stage of holes forming. These sorts of socks really aren't worth wasting our money on, so in future, we'll be buying stronger, better quality socks to start with.

And no, just for the record, I don't need to mend socks, I could very easily go out and buy new ones. It's a conscious choice DH and I have made, to make do with what we have where we can, to repair, reuse, recycle, instead of buying new. To grow cotton takes an enormous amount of water, and lots of pesticides, by making our socks last twice as long, we are halving the amount of new material we need, and though it might be only a drop in the ocean, I believe every little bit adds up.

28 May 2008

Herbs

I've never been real big on herbs, mainly because I never knew what to do with them. When I was a kid, spaghetti was savory mince with pasta (I don't think my dad was too fond of tomato sauce!), then when I left home, I discovered bottled pasta sauces. A few years ago, I started experimenting with making my own. This, of course, lead to learning a bit about herbs. Which, in turn, lead to growing them.

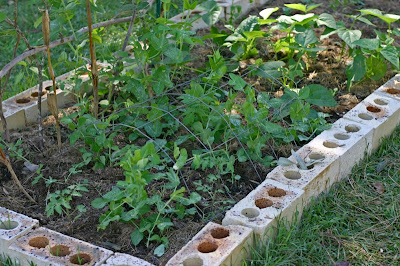
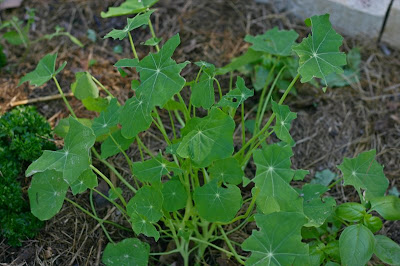
I had the parsley for a while, but now that the tomato plants that were shadowing it are gone, it's really taking off. I bought some sweet basil and some oregano and planted it out, should have plenty. There is also a nasturtium in the middle and some comfrey (for making fertiliser) in there as well. At the back is my aloe vera plants, a very handy plant for sunburn and general skincare. In a pinch, it will also remove chlorine from water.

Since the first photo was taken, I've also planted some lemongrass, which I believe is useful for deterring mosquitoes. We certainly need all the help we can get with that!

I still have a lot to learn about herbs, and their use both in cooking, and in other areas, but I've made a start. Hopefully I'll see this section of the garden grow along with my knowledge over the next few years.

27 May 2008

Garden Update

Back at the beginning of April, I wrote here about the Aussies Living Simply garden challenge. I thought it was time for an update on how the garden is going now, and the growth over the last 2 months.

This was my original garden when we moved here, and I totally re-mulched it, and added a lot of compost, and it's now doing very well with my peas and beans in it.

I planted both climbing peas (sugarsnap) and normal peas (greenfeast), and some slenderette bush beans. This is how much they had grown by 3rd of May.

Here they are again just two weeks later, on the 17th.

And finally, a few days ago, the 24th. You can see signs of a few pea flowers, there are even more now.

I planted my next lot of peas in the next section of the bed, massey this time. This is from the 17th of May, and they haven't grown too much since. I think the colder weather is affecting them, as it's getting quite wintery now.

I'm going to do a few more garden updates in the next few days, as it's been a while since the last update. I keep taking photos, but have so much to post about, that they often get forgotten. Tomorrow... herbs! Actually, no, tomorrow is low-tech Wednesday, so maybe on Thursday, if I don't find something more interesting to write about in the meantime!

24 May 2008

Biccies!

As I was surfing around in Blogland today (as if I don't have anything else to do!), I came across this recipe for chocolate chip biccies over at The Tin House, and just had to try them out. Since we're gluten free in this house, I removed the weet-bix and oats, and added half a cup of crushed macadamia nuts, and half a cup of coconut instead.

They were a big hit, and are almost all gone already (just eating one as I type). I made half of them bite sized, yum, and DH did the other half slightly larger. I think I like the bite sized ones best. There was a little too much mixture to fit on my two trays, so I've frozen some of it, and will cook it up later and see how it goes.

They were just the snack, along with a drink of cold, filtered rainwater, for DH, who was working hard mowing the jungle up there in the orchard.

Access Denied!

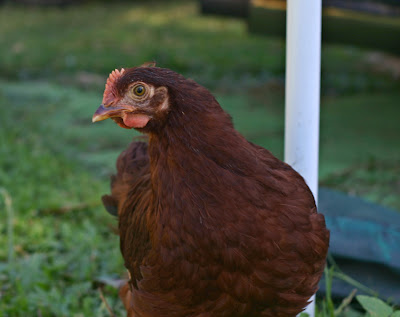
Our chooks are about 10 weeks old now, and look almost like full sized chooks. They still have a little growing to do, but not too much. This is a pic of one of the ones I'm pretty sure is a rooster. His comb and wattle are larger than the others (except the other suspected rooster), and he's starting to get some greenish feathers in his tail. He's beautiful though, isn't he?

Unfortunately, they aren't as well behaved as they are beautiful! Since we put up the fence to keep the neighbours dogs out, they've become a lot more adventurous. They soon discovered my compost heap, and had a lovely time digging around in it. Then they discovered the grass I keep nearby. This used to be a nice, neat pile! Look at it now!

Then they discovered these tomato plants that self seeded behind the compost bins. I thought tomatoes (being a member of the deadly nightshade family, like potatoes) weren't a good thing for animals to eat, but apparently the chooks thought differently!

This is what they used to look like!

The grass and compost scratching I could handle, even the tomato eating, since they self seeded and it looks like I'm going to have tomatoes everywhere, but it was the last straw when they actually got into the garden bed! They love the nasturtium leaves, and now they've started on the pea and bean leaves.

It was time to take action, before there was nothing left!

After considering all the many options (OK, so there really was only one), we settled on using some of the wire we'd bought to go around the boundary fence to make a garden fence. We had a few star pickets that DH's dad bought over, so there was no actual outlay (although now we'll have to buy more wire for the boundary fence at some point).

Once we started, we were almost regretting it, and trying to work out other options, as the span down one side was quite long, and getting the wire taught was not as easy as it seemed, but we persevered, and once the first side was done, the rest were much easier. It doesn't have to be particularly strong, as it's only to keep chickens out, so I think it will do.

The gate is just a typical paddock gate, with a stick down the side (left over poly pipe from the original chicken tractor), a loop of wire to put the bottom in, and a loop of wire to hold the top in. DD has spent the afternoon trying to work it out, and she can open it, but not close it, LOL.

The chooks spent the afternoon wandering around the outside of the fence, pecking at the grass, and wondering why they had suddenly been locked out of their favourite scratching place!

23 May 2008

Hanging in the Balance

That's how life feels right now. The house is really nearing completion, and we all feel like we're in a holding plan. It seems barely worthwhile putting a lot of effort into organising here in the shed, as we're so close, yet still we know there's another week or more of building, then we still have to get the floors installed and a few other bits and pieces, before we can move in.

We had the electrician here today, putting in the stove, switches and lights, so that's one more step done. Of course, peering through the windows I can see that they've used ordinary globes, not energy saving ones! Those will be changed before we even move in. I think they have 10 packs at Bunnings! The water tank has arrived, but is sitting on it's side in it's space. Hopefully we don't get another high wind like the ones we had the other day, or it would go over. I'll try to take a pic tomorrow to post.

I think this is one of the most stressful periods of this building journey, almost as stressful as when we were waiting for the shed to be done so we could move in here. I'm trying to distract myself with mulching the fruit trees, working in the garden (going to need to put a fence up, the chooks have discovered my seedlings), and planting out some cuttings ready to go into the house as soon as we have keys. But I spend a lot of time flitting from one thing to another, never achieving too much.

DH has the weekend off though, so hopefully there will be some progress outside, and some pictures to post tomorrow!

20 May 2008

A Weekend in the Country

OK, so technically it's not the weekend, but since DH works every second weekend, and has Monday and Tuesday off instead, it was a weekend for us. For many city folks, a weekend is a time to relax, to pick some entertainment out of the many on offer, or maybe just stay home with a video. For us, it means a chance to catch up on all those jobs that have been building up during the week.

Black Sapote

First order of business was planting. This poor Black Sapote (chocolate fruit!) that has been sitting out the front of the shed for nearly a month now, finally rests in it's new home in the orchard.

Bowen Mango

I finally managed to find a Bowen Mango at the markets this week. I've checked the mangoes each week, but they're always names I can't pronounce, so I leave them. This week I got lucky though. This one is a seedling, not a grafted one, so we'll see how it goes. It's right up in the back left hand corner of our place, where we discovered what looks like sandstone! OK, not really, but it's sandy, and as hard as a rock! We dug a whole MUCH larger than the pot, and filled it with compost and broken up soil, so hopefully by the time it hits that solid sand stuff, it will be strong enough to break through! I'm going to have to keep the water up to it though, which means carrying watering cans about 50 metres back and forth!
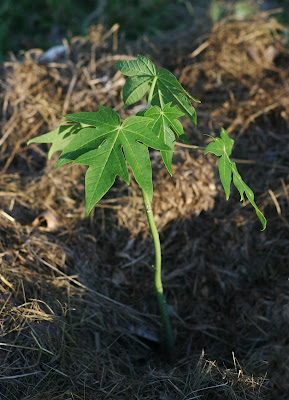
Paw paw

I also bought three paw paw trees for $6. These are the old style variety, where you need male and female trees to get fruit. With three, I stand a good chance of getting one of each.

Blueberry

And finally, my blueberry bush. I'm not sure that I've every tasted a blueberry, they're usually about $6 a punnet in the stores, so I'm looking forward to this one getting big enough to try our own.

Combine these 6 new fruit trees/bushes with the ones we already had: Washington Navel Orange, Valencia Orange, Mandarin, Lemon, Persimmon, Black Fig, Black Mulberry, Tropical Peach and Tropical Nectarine, and we now have 15 fruit trees! Of course, I think I still have a list that long, if not longer, of ones I still want to get!

Bambusa Textills (var Gracilis)

On top of the fruit trees, I also planted out one of the two bamboo plants I bought at Bamboo Land while visiting my mum. I've been considering bamboo for a while, and a visit to this beautiful nursery convinced me that I really needed some. They have a beautiful garden of mature bamboo that you can walk through, and pick out your varieties from. Then you go back to the nursery to take your pots home. This particular species grows up to 8 metres tall! You can find pics of the mature plant here. And before anyone asks, yes, it is clumping. It's planted up the back, where it will give us shade from the western afternoon sun, and not be in the way. I also have a smaller bamboo plant that we have yet to plant, that I can't remember the name of right now.

All the new plantings were watered in well, and fertilised with some 'Rooster Booster' (aka chook manure pellets). I didn't have a scoop, so I made this handy one with a cut down milk bottle. We have a similar one in our bag of chook pellets for feeding the chooks. Waste not want not!

DD thought it was great that we were fertilising the garden with rooster poo, and went around talking about it all afternoon! "When I make my garden, I'm going to plant my flowers, and put rooster poo all around them!" Aren't kids cute?

You would think that all that planting was enough for one weekend, wouldn't you? But no, I also ended up putting up 50 metres of chicken wire on our fence to stop our chickens from wandering into the neighbour's yard where their dogs are. (And to keep their dogs and chooks out of our yard!) So far, it seems to be working, although there is still a lot left unfenced.

19 May 2008

Potato Harvest

We harvested our first homegrown potatoes yesterday. This is the haul from the one bush that we've checked so far (we have one more, but will wait for a bit longer).

There were a few others that were far to small to even bother with (like thumbnail size), but these were a decent size. Largest potatoes I've ever grown in fact. DD was very excited to actually dig up our own potatoes, and carried them all inside two at a time, and hoarded them like eggs in a nest for a while. She also carted off the tiny ones to play with.

I had assumed that the bush had died off because it was time to harvest, but when I dug it up, the base of the stem was covered in these tiny insects which seemed to be chewing through it. I'm not sure what they are, but it's no doubt that if they hadn't killed my plant, we would have had twice this number of potatoes. I've done several Google searches, but can't find out what these are, so if anyone can tell me, I'd be really pleased to hear.

Tiling is Done!

Yet another step on our road to actually having a house that might be a bit warmer than this shed! I totally love these blue tiles, and can't wait till I can do my washing in this beautiful, bright laundry!

And, of course, have a shower in this lovely shower. It looks a little dirty already though!

We're all getting a bit frustrated about the non-finished state of the house right now. The date we've been given for completion now is June 3rd, DD's 4th birthday. While it would be a nice birthday present, it would have been even nicer if we could have been moved in, so we could have a nice party in our new house! Apparently the problem is getting the water tank delivered, which I can well believe, water tanks are hard to come by in Brisbane with this drought going on. They're selling out faster than they can get them in. I would have thought they could have ordered it early enough to prevent this problem though!

We might not be so impatient, but it's getting COLD in this shed. The minimum night temp is hovering down in the low teens, and while it isn't too bad once you're in bed, typing on the computer at this time of night makes for cold fingers, and it's very hard to get going in the morning. I suspect that part of it is due to the concrete floor and the shade trees that were so wonderful at keeping us cool in summer making it seem cooler than it actually is. Once you're outside in the sun, it's quite pleasant, but otherwise, well, lets just say I'm very busy knitting slippers and warm clothes for everyone! (Hopefully some more pics of those soon, I've nearly perfected my slipper pattern I think.)

18 May 2008

Autumn Leaves

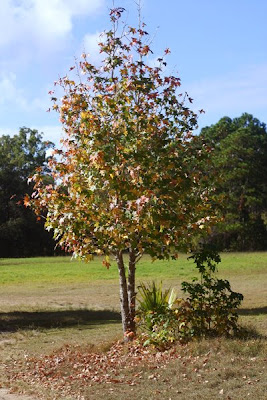
Autumn is such a non-event in Australia. Surrounded by evergreens, the season passes with little notice other than the fact that it's getting cold. Since it rarely drops below freezing here in Brisbane, the beginning of cold in autumn is only a little milder than the mild winter cold. Which is why this liquidamber tree at my mother's inspired me last week.

I wanted to make a patchwork rug for DH like this one we made for DD last visit, but the colours we had in the velvets were limited. That's one of the problems with sewing from recycled materials, you can't just go out and buy what you need to finish a project, you have to work with what you have. Not that I've had much luck with finding what I want in craft stores when I go looking. Anyway, as you can see when we made DD's quilt, most of the velvet was pinks and reds. I slowly pulled out a pile of other colours, browns, reds, and a tiny bit of orange, and eventually picked out all the other colours I had, and was left with a beautiful array of autumn colours, that inspired me to send DD out to pick an autumn leaf from the tree.

This is the rug that eventually worked it's way out of the materials, and I'm pretty pleased with how it turned out from a bunch of velvet that initially looked all pink. Because of all the agonising over colours and patterns, it took most of the day to complete this one, unlike DD's rug, which only took a few hours.

We used the bitty leftovers of the velvet to piece together the back, since none of the colours that were big enough to do it in once piece fitted in with the autumn theme.

These appliqued leaves added the perfect finishing touch I think, even though my Mum and Dad kept saying they were stars! Hopefully when we pull this rug out next autumn, as it starts to get cold, it will help us feel a little more autumny. Hopefully the little liquidamber's that I plan to dig up from around the base of my mum's tree and plant in our front garden will help as well.

17 May 2008

Craft Retreat

DH has been working long hours completing a course for work this week, so DD and I headed up to my mum's for a visit, some R&R, and of course, some crafting! I had these shirts already cut out, and DD had painted the pic (it's 3 flowers, 2 butterflies, and a bee if you can't recognise it), and we sewed them up pretty quickly. All made from recycled shirts from the $3 rack at the local second hand shop. Even the ribbing is from a second hand rib t-shirt.

These were made from a flannel nightie at my Mum's local second hand shop. The ribbing, again, was from a second hand t-shirt. The top pattern is adapted from the same pattern used for the t-shirts above, just with longer sleeves, and ribbing at the bottom as well. The pants were a new pattern my mum had, but when we did our first try on, they were too tight around the waist, hence the pink ribbing gussets on the outside of the legs. They look great though, as if it was intentional!

OK, I have to admit it. These were made from new material that my mum bought when DD was little, and I've been waiting for a chance to sew up. It is patchwork flannel, and very bright and colourful. The ribbing is second hand though! We only had a limited selection of colours, no blue, and the only yellow we had just wasn't bright enough, but I think the red works pretty well. And no, we didn't just like the side gussets so much we repeated it, we cut both pairs out at once, so had to make the same adaptations to both!

Not bad for about 4 days of sewing is it? There is one more sewing project, but it deserves a whole post to itself, so you'll have to wait till tomorrow to see it!

10 May 2008

Give it up!

That is the latest challenge on Aussie's Living Simply, and I'm doing my best to rise to the occasion. The picture I really need at the top of this post is a picture of a tissue box crossed out, but I don't have one, so you're going to have to do without. Yes, I'm giving up tissues! It's something I've been meaning to do for a while, as with all my allergies, we go through a LOT of tissues. Like a box every few weeks. At $2 a box, that's a few hundred dollars a year! And not to mention a bathroom rubbish bin that is always full of used tissues! The really cincher though was when I found out that tissues have formaldehyde in them! So DD and I are now switching over to hankies! Not a problem for DD, who prefers them anyway, I think because they are less floaty and irritating around her face.

Being me of course, I'm not going to go out and buy hankies, I set about making my own. I didn't have any suitable cotton (although I think old cotton sheets that are past their bed covering days would make lovely tissues, my old ones are all poly cotton from the days before I even looked at those sort of things), I decided to give flannel a go. I made up about 4 a month or so ago, and DD and I have been using them on and of (when they're clean), and found them definitely usable. So no more excuses! I cut up an old baby bunny rug that I found for 50c a the second hand shop, and a piece of flannel left over from my nappy making days, and overlocked the edges. Didn't take too long at all (except for threading back in the overlocker threads, I HATE that bit!)

And here they are! I'm pretty pleased with how they turned out, the colours actually look really pretty together, and I think we should have plenty to last us for a week or so if necessary (or if we have a cold!)

I think this challenge is going to be pretty easy!

9 May 2008

Painting is Done!

And the doors are hung. Finally got a look inside today after the builders had left, and it's looking nice. Really starting to look like a house now that it's all the one colour! The paint smell is awful though! This is the view from the kitchen, looking down the hallway to the bathroom and bedrooms.

And this is the badly stitched together view in the other direction, looking towards the kitchen. As you can see, I have a good view of DD's cubby from any of the windows in the main living areas. This was definitely planned! Sorry about the quality of the photos, I had to take them with DD's point and shoot, as my lens doesn't have a wide enough angle.

And since they were sitting there, these are the floor tiles for the laundry, bathroom and toilet, a very pretty blue.

I think the wall tiles are white, but I can't remember for sure. This is the accent tiles though, again, blue. Yes, I like blue!

And, since today is the 9th, and the house isn't finished, I guess the expected completion date wasn't worth much! Hopefully in a few weeks...

My First Completed Item

That is, the first item I've made completely from spinning the wool, to knitting it up. These slippers were knitted with the first wool I spun, some very expensive wool from spotlight! About $5 each! Scary. But they are pretty, and DD loves them, and wants to wear them all the time, which is a plus from a child who's statement usually is "I like being cold!"

I ran out of the original wool I had bought, and the slippers didn't go up the ankles far enough o stop them slipping off, so I spun up some of the new wool I have, and used it to crochet around the ankles a couple of times, added a bow and a frill, and here you go. I think it was the frill that won DD over!

Now I just have to wind the rest of the wool up, and I think I'll knit some socks out of it!

As someone kindly pointed out, this wool is not plyed. I didn't have enough of the initial slipper wool to ply, so I knitted it in one ply. Since I needed some of this extra to finish off the slippers, I didn't ply it either, and I think that will be good for my socks, as I don't want the wool to be too thick. I'll give plying a go on my next lot of wool, which I think will be some beautiful brown fleece.

6 May 2008

Solar!

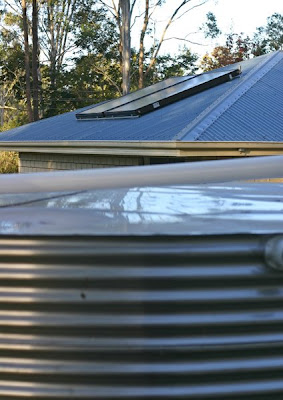
I was doing the washing up this afternoon, and I just happened to glance down the hallway and out the door, and this was the view that greeted me! Our solar (hot water) panels are on! No storage tank yet, but it's a start. I guess they must have gone on today, as there were about 4 cars/ute's here today doing stuff. I thought they were all painting, but I guess not.

The painting does appear to be done though. With a spray by the looks of things. Can't see inside because the windows are all covered, but I can see where the spray has gone over the plastic covers. It's very good to see some progress, after about 2 weeks of NOTHING. I don't see any way it will be done by the 9th, but hopefully in the next few weeks.
Edited to say: I keep coming back to look at this picture, and it gives me a great deal of satisfaciton. I think it sums up our new house far more than any picture of the actual house could. The water tank in the foreground, solar panels on the roof, and gum trees (not on our place) in the distance. I finally feel like we're starting to get there!