I've been making dolls for as long as I can remember. My mum tells me, and I have vague memories of making dolls clothes out of wrapping paper and sticky tape before I could sew. I would have been about 5 or 6 at most. I made my first real cloth doll when I was 7, on my grandmother's old treadle sewing machine.

When I grew up and left home, I discovered I really was too old for dolls, and I had little excuse to make them. Then I had a daughter. Ahh, what a wonderful thing a daughter is. Of course, with a baby and a toddler, the last thing I had time for was sewing. But she is growing up, and finally is getting interested in helping me. So I've spent the last little while making a fairy doll for her little friend's birthday present, and of course, a mermaid for little miss so she doesn't feel left out.
I tend to make things by trial and error rather than using any specific pattern, so this isn't really going to be a tutorial so much as a record of what I did this time and how it worked. Maybe it will inspire someone.
I started off searching the web for fairy doll patterns, and that is how I discovered Waldorf dolls. Oh they are so beautiful. Simple, yet detailed, and with such a childish innocence. I was hooked. I found a few sites that explained some of the process, enough to get me started, and from their I improvised. If you're looking for instructions, The Silver Penny has pictures and instructions on making the heads, and Echoes of a Dream has a great set of instructions and pictures for making the whole doll.
So, firstly making the heads. I kind of amalgamated the instructions at both of the above sites. I didn't have any wool for the stuffing, so I used poly filling, which I have heaps of. I wound it into a ball, and then tied a square of quilt batting over the top. My daughter was most intrigued by the process, and continually wanted to 'help'. Here she is helping to hold them while I photographed them.
 Then I used some cotton string to shape the faces. Like this.
 Then I did very little for several days. This is a very important step in the process.
My next challenge was some material for the bodies. Although I compromised on the stuffing, I wanted this to be cotton. Unfortunately I had nothing in a suitable colour. I tried the local Lincraft, and they had NO interlock at all, and DD got heartily bored of staring at all the wool, none of which was really suitable for hair.
On to Spotlight. I had more luck finding interlock here, and even 100% cotton, once I realised I had to look in the baby material aisle! Unfortunately, none of it was skin coloured. I finally settled on a yellow, even though I knew it wasn't quite right. Home to my fabric paint, and several subtle applications of pink later, I had something pretty close.
 Sewing the cover for the head took a couple of goes of sewing, trying it on, making it smaller, and trying it on again. Finally got it right though. Hmm, it looks very yellow in this pic. That will teach me to play with the colour balance in photoshop too much!
 Once the basic head was done, I moved onto the body. Here are the pieces for the mermaid, which is why there are no legs.

They were pretty simple shapes. I've made some very detailed bodies in my time, but for young kids, I think simple is best.
Here is the finished body, with coffee cup included for a size comparison. This doll is designed to live in the little girl's dollhouse, so this will be the perfect size.
 Next the face. A simple, Waldorf face. The idea is to set out the eyes and mouth in an equilateral triangle, and it works very well. You place pins first to get the position, then embroider the features.
 Next comes the tricky part, hair! I've read in several places about embroidered caps with wool hooked through it, but haven't found any hints of free patterns. So I figured I'd give it a go. I couldn't find any suitable wool from natural fibres, so I've used a 4 play rainbow crochet cotton that I found at Spotlight.

I'm not very good at crochet, so I can't give you a pattern, but I'll try to explain what I did.

I started off with 4 chain, joined in a circle, then worked 6 double crochet into the circle. Next row I again did 6 double crochet into each stitch. I figured I needed to enlarge it a bit before making it cap shaped, so for the next 3-4 rows I alternated between one and two double crochet into each stitch, then went back to one double crochet into each stitch to bring it into a cap shape. For the second one for the mermaid, I was even more random, switching between the 1-2 pattern and the one per stitch as it seemed to need it. Here is how it shaped to the head.
Once the cap was made, it was time to add the strands of hair. I've you've ever done latch hook, it's kind of like that. I do have some latch hooks in the shed, but I think they would have been too big for this, so I just used a crochet hook like this:

Once I had done the first row around the edge, I sewed it on. I decided to pin it before sewing it to make sure it was in the right place (and I have an aversion to pinning, so if I pin, you know it's a good idea).
 I just used normal sewing cotton and slip stitched it around the edge.

Finally, I hooked in the rest of the hair. This was very time consuming, and I kept losing track of where I was hooking, but the end result was worth it. The hair can now be styled any way you like, and is brushable with a brush with rounded ends.Here she is, the finished doll!

Then, of course, there were clothes to make.
I wanted something pretty and fairyish, and luckily for me DD had had a lace dying episode the previous day. I had limited her colours to yellow and pink, and they were prefect for this project. It was thick, doubled sided lace, and I cut it down the middle, slightly off centre, and gathered the two pieces together. Length of lace was as much as I could get that was continuously coloured!
 At full gather, it made a nice circle like this. Isn't it pretty?
 I still had no idea what to do for the bodice, so finally I turned to my trusty ribbon stash.
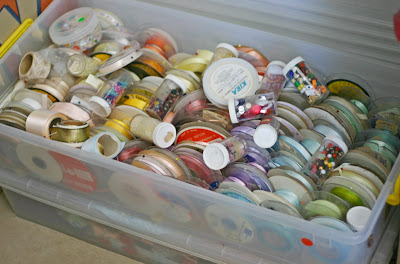 No, seriously, I'm not a hoarder. Craft stuff doesn't count, right? No, I got lucky. My mum bought the stock of a craft store going out of business a few years ago, so I have boxes and boxes of this stuff. I rarely have to go to the shop for laces, ribbons, elastic or thread. I have it all right here! My own personal craft store.
OK, back to the regularly scheduled program. Now where was I? Oh yes, bodice. I won't bore you with the details, because I didn't take pictures, and totally made it up as I went along. But here is the finished dress.

Now all that is missing is wings! This was quick and easy. I drew a quick pattern on some printer paper, pinned it to a cotton skirt I picked up at the second hand shop, and didn't even bother to cut, just sewed around the edge.

Then cut around the edges, and turned it right way out. Plain pink wings, hmm, that seems a little boring...

Ahh, that's better. Now a couple of loops to put over her arms, just like the kids dress up wings, and she's ready to go.

Scroll down for a pic of the finished doll right before we headed off to the party in the next (or should that be previous?) post.
I haven't quite finished DD's mermaid yet, still procrastinating on finishing the hair. Will post pics when it is done.

 Well, already the new challenge is spuring me on. I sat down this afternoon and finished DD's mermaid doll. It only took an hour or so, I can't believe I've been putting it off so long!
 DD really wanted this bright red acrylic wool for the hair. I didn't have anything else in quite the right colour. Damn Disney's Ariel! DD is really happy to have her doll finally, and is here telling me she is going to cuddle it in bed tonight.


